From the beginning of the planning I've had a pretty good idea of what my animation was going to do. I wanted to make use of as many tools, modifiers, shapes, objects and different types of animation as possible. My original plan was to shoot four scenes, those scenes being intro, shooting barrels, shooting statue, and finally shooting human. I wanted to show off how different modifiers and forces impact the environment during the crossbow shooting, such as wind blowing the crossbow bolt slightly off course, but unfortunately I wasn't able to apply the force to anything except cloth, which I used for the flags and banners in the animation. Another thing that changed slightly was the scenes. I took out the statue scene and replaced it with an additional barrel scene. I did this because unless I built the statue out of individual elements, I wasn't able to create a smashing effect, and the animation wouldn't have looked as good without it. I also changed the last scene alot due to restructions with the bipod and rigid body modifier.
Scene One
I managed to get this scene almost exactly how I wanted it to be. The scene served as an introduction to the animation, and took us through the castle and into the courtyard where the crossbow was in place. I did manage to get a human modeled and animated, and during this scene you can see him waving at the camera at it passed, and he tracks the camera with his head. I animated the human using the auto key for movement of the arms, fingers and head of the skeleton, and for the camera I used a free camera and manually set keys for each movement and rotation from start to finish.
Scene Two
Scene two overlaps on what I wanted scene one to originally have at the end. I changed the text overlay from 'wind speed & direction and durability of object' to 'giant crossbow vs. object' as I wasn't able to get the wind force to have any impact on any non-cloth item in the scene. I was however able to make the barrel explode when shot at by the crossbow bolt, as opposed to the barrel just being hit and falling over. I did this by using one of my old barrel rigs where I had set up a dynamic rigid body to each individual part of the barrel, and hadn't attatched the barrel together. I set it up in a kinetic state up until the frame where the bolt is about to hit it, when it transforms into a dynamic state and exploding. I found this way to be effective for the purpose of my animation, however the barrel only explodes because of the kinetic grip that it has until a certain frame, and not because of the crossbow bolt hitting it. Another use I found for using kinetic until a certain frame was with the crossbow bolt itself. If it started off in dynamic it would just fall through the crossbow and not go anywhere, as the crossbow itself did not have a rigid body defined. I set it as kinetic until the point where it had been shot out of the crossbow and was moving by itself towards the barrel. Another couple of objects I had to attach a rigid body to was the ground plane and the wall behind the barrel, and these are both static and with collisions enabled so that dynamic objects do not pass through them.
I also decided to use two camera shots for showing the explosion, as it adds a different perspective and for the second camera I used a directional camera which was focused on the barrel.
Scene Three
This scene is similar to scene two, except this time multiple barrels are being shot at as opposed to just one.I decided to stick with only one barrel exploding - the one that is hit by the crossbow bolt - as unfortunately I wasn't able to animate an object that had a kinetic rigid body on, nor was I able to make the barrel shatter by itself as it hit the ground as a dynamic rigid body, which is a shame because if I could have done that, I could have applied that same technique to all of the barrels instead of having to make the exploding barrel 'self-explode.' An additional technique I used in this scene is panning the second camera around as the barrels are falling down around it. Originally, there was a barrel that lands right in front of where the camera stops, but when I rendered the animation something must have changed as it came out slightly differently and the barrels didn't fall in the exactly same way.
Scene Four
Scene four is the shortest scene of all and only really serves as an outro to the animation. I tried to make it so the human got hit by the crossbow but I didn't really know how rigid bodies worked on skeletons and when I attempted to enable a dynamic rigid body, either nothing happened or the model teleported half way across the scene for unknown reasons. Due to this, I changed this scene so that it bought some closure to the animation by carrying on from where scene four left off, and flying the camera back past the crossbow and into the wall behind it.
When rendering, I wanted to render the animation in 720p (1280x720) so that it would be high definition and the animation would be more visable, however when setting the output to the correct resolution, it still rendered as 720x480. I tried to fix this before rendering out my final animation but I wasn't able to find anywhere with any information on it. Therefore the scenes are rendered in 720x480 at 25 frames per second.
I decided to add a sound track over the top of my animation to add more emotion and tension to the footage. I wanted to use something without vocals and I decided on using a track called Wax Figures by 65daysofstatic. I edited the track in Audacity to lower the volume and slow down the track slightly, and imported everything into Adobe Premier before re-rendering.
Overall I'm proud of what I've produced even though alot of what I had decided upon being in the animation didn't happen. I've learnt alot about 3d modelling in general and have got good use out of both Autodesk 3DS Max 2011 and 2012. I've enjoyed the module and will use what I've learnt during the course of the semester in future projects.
Thursday, 3 May 2012
Creating Life 2
After witnessing how models can really come to life and take form after we learned how to rig a body with a biped and make it move around, I decided that I will give it a go to create a decent human model that I can use in my animation. To start off with I browsed around the internet for videos and tutorials to follow and the best one that I found can be located here on a youtube playlist: http://www.youtube.com/playlist?list=PLE4693155A242C51F&feature=plcp
There are quite a few videos to go through and alot of time goes into making the model, and although the series isn't (and wasn't) finished at the time of me creating my model, I think that it came out good and helped me learn alot about 3ds Max and enabled me to more efficiently reproduce this for future use.
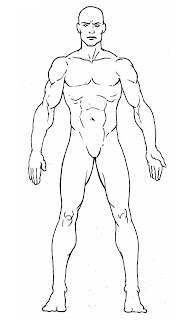 The very first thing that you need to create a human model is a blueprint, and this is also where I went wrong with mine. The one I chose - although its the best one I could find - isn't in the correct pose and that caused some problems later with rigging the mesh. It also isn't very symmetrical, which was important for saving alot of time during the modelling process.
The next thing to do, after aligning your blueprints in your viewports and setting your view to orthographic, is to create a box in the torso area. After you have this, convert it to editable poly, delete half of the shape and enable a symmetry modifier. From here it's a matter of extruding polygons and pushing and pulling vertasis until your model lines up with the blueprint in the front viewport. The torso is the easiest part of the body and doesn't require too many polygons, and it starts to get more difficult with the arms and legs but they don't have to follow the blueprint exactly, and in my case I chose not to as it looked far too muscular.
Once you have this basic shape, you need to work on getting the model correct in the side view port, and this is where the model starts to actually take shape. Getting definition correct means adding vertasis and polygons where nessecary, but the model doesn't have to be perfect to start off with so it's not overly required to start off with. Once you're happy with what you have, now you can go about adding more polygons and trying to smooth the shape out a bit, just so it doesn't look so flat. I made rings around the arms, legs, side of the torso as well as plenty of others around the model to try and make everything look more realistic. On a side note, I'm not sure why my torso looks so smooth on my model at this point as I haven't applied any other modifiers to it yet.

Once the body is at a quality of which you are satisfied to, its time to start the head area. To prepare for this, the neck needs to be in place and the best way to do this is to extrude a polygon from the top of the shoulders straight up and scale it down, extrude it again, scale it up and rotate it to where it should go. The head is modelleled seperately to the body as it requires alot of detail and is much harder to get right. To start off, create another box and position it in both the side and front view ports to match the blueprint, then convert it to editable poly and use the relax tool on it to smoothen all the vertasis and make the head more of a round shape. Once you've done this a couple of times, model the rest of the head by pushing and pulling vertex to match the blueprint. Here's what mine looked like with a couple of eyes and turbosmooth enabled on both the head and the body.

The facial features are definately the hardest part of modelling a human and it takes alot of practice to get right. In the video tutorials, he started with the mouth, eyes and then nose and the series ends there without any continuation of how to attatch the features to the face, or without ears, hands or feet. I followed the tutorials for the facial features and did my best to put them in place just by positioning them and using the attach tool and welding vertasis together, but the process was very demanding and complicated. Once I had the face complete, I started modelling hands and feet for my character. For the hands, I started with a box and extruded points out to make fingers and a thumb and scaled and rotated the polygons so that it mimiced a real hand. I'm proud of the way the hand turned out as I didn't use any sort of reference and I felt as if I had started learning alot about how to use the program. There was alot of pushing and pulling vertasis involved, as with the rest of the body, but I was able to create a basic hand shape with finger nail-like shapes on the end of the fingers.

I didn't put as much detail into the feet as I put into the hands because I wanted to make shoes on top of the feet, or at least make the feet look like shoes. I started with a box and followed the blueprint to get a smooth shape, just the same as with the body. After I had everything created, I attatched everything to the body and enabled a turbosmooth to see what it looked like. Because I hadn't properly attached the vertasis on each shape, it looked a bit weird but it worked and looked good for my second attempt at a human model. Now that I had the model done, it was time to rig it up with a skeleton or biped.

This process was fairly straightforward since I had done it once before, and this time I even added fingers. I did run into some problems with the mesh while enveloping, because of the way I had created the model (and also with the fingers as the bones were too short) there was some tearing in place, noticably when the character raised their arms or when bending over. I did my best to correct these imperfections, but most of them were unfixable by this stage. I know for next time to model a body with arms and legs both stretched outwards and away from each other and the body, so that I don't get this anomoly happening again. There was also alot of tearing around the pelvis, which I assume was because I made the bone too big but I'm not sure and wasn't able to fix it.
Once I was content with the model and all the enveloping had been done, I imported the character into my scene and textured him with some colours for skin colour, top and trousers. I would have like to have made some clothes for the model, to fit the 17th century Italian theme, but unfortunately I didn't have any idea on how to make clothes or any details that resembled clothing, so I had to settle with colouring him with the material editor. After doing this, I sat him in place on a bench in the courtyard and prepared him for my animation.

Overall I'm happy with the model and how it came out, even if it didn't work completely as intendid, I'm glad I was able to have time to model a human and fit it into my animation to show that I have learnt about it and was able to do it.
There are quite a few videos to go through and alot of time goes into making the model, and although the series isn't (and wasn't) finished at the time of me creating my model, I think that it came out good and helped me learn alot about 3ds Max and enabled me to more efficiently reproduce this for future use.
 The very first thing that you need to create a human model is a blueprint, and this is also where I went wrong with mine. The one I chose - although its the best one I could find - isn't in the correct pose and that caused some problems later with rigging the mesh. It also isn't very symmetrical, which was important for saving alot of time during the modelling process.
The next thing to do, after aligning your blueprints in your viewports and setting your view to orthographic, is to create a box in the torso area. After you have this, convert it to editable poly, delete half of the shape and enable a symmetry modifier. From here it's a matter of extruding polygons and pushing and pulling vertasis until your model lines up with the blueprint in the front viewport. The torso is the easiest part of the body and doesn't require too many polygons, and it starts to get more difficult with the arms and legs but they don't have to follow the blueprint exactly, and in my case I chose not to as it looked far too muscular.
 |
| basic shape (symmetry off) |
Once you have this basic shape, you need to work on getting the model correct in the side view port, and this is where the model starts to actually take shape. Getting definition correct means adding vertasis and polygons where nessecary, but the model doesn't have to be perfect to start off with so it's not overly required to start off with. Once you're happy with what you have, now you can go about adding more polygons and trying to smooth the shape out a bit, just so it doesn't look so flat. I made rings around the arms, legs, side of the torso as well as plenty of others around the model to try and make everything look more realistic. On a side note, I'm not sure why my torso looks so smooth on my model at this point as I haven't applied any other modifiers to it yet.

Once the body is at a quality of which you are satisfied to, its time to start the head area. To prepare for this, the neck needs to be in place and the best way to do this is to extrude a polygon from the top of the shoulders straight up and scale it down, extrude it again, scale it up and rotate it to where it should go. The head is modelleled seperately to the body as it requires alot of detail and is much harder to get right. To start off, create another box and position it in both the side and front view ports to match the blueprint, then convert it to editable poly and use the relax tool on it to smoothen all the vertasis and make the head more of a round shape. Once you've done this a couple of times, model the rest of the head by pushing and pulling vertex to match the blueprint. Here's what mine looked like with a couple of eyes and turbosmooth enabled on both the head and the body.

The facial features are definately the hardest part of modelling a human and it takes alot of practice to get right. In the video tutorials, he started with the mouth, eyes and then nose and the series ends there without any continuation of how to attatch the features to the face, or without ears, hands or feet. I followed the tutorials for the facial features and did my best to put them in place just by positioning them and using the attach tool and welding vertasis together, but the process was very demanding and complicated. Once I had the face complete, I started modelling hands and feet for my character. For the hands, I started with a box and extruded points out to make fingers and a thumb and scaled and rotated the polygons so that it mimiced a real hand. I'm proud of the way the hand turned out as I didn't use any sort of reference and I felt as if I had started learning alot about how to use the program. There was alot of pushing and pulling vertasis involved, as with the rest of the body, but I was able to create a basic hand shape with finger nail-like shapes on the end of the fingers.

I didn't put as much detail into the feet as I put into the hands because I wanted to make shoes on top of the feet, or at least make the feet look like shoes. I started with a box and followed the blueprint to get a smooth shape, just the same as with the body. After I had everything created, I attatched everything to the body and enabled a turbosmooth to see what it looked like. Because I hadn't properly attached the vertasis on each shape, it looked a bit weird but it worked and looked good for my second attempt at a human model. Now that I had the model done, it was time to rig it up with a skeleton or biped.

This process was fairly straightforward since I had done it once before, and this time I even added fingers. I did run into some problems with the mesh while enveloping, because of the way I had created the model (and also with the fingers as the bones were too short) there was some tearing in place, noticably when the character raised their arms or when bending over. I did my best to correct these imperfections, but most of them were unfixable by this stage. I know for next time to model a body with arms and legs both stretched outwards and away from each other and the body, so that I don't get this anomoly happening again. There was also alot of tearing around the pelvis, which I assume was because I made the bone too big but I'm not sure and wasn't able to fix it.
Once I was content with the model and all the enveloping had been done, I imported the character into my scene and textured him with some colours for skin colour, top and trousers. I would have like to have made some clothes for the model, to fit the 17th century Italian theme, but unfortunately I didn't have any idea on how to make clothes or any details that resembled clothing, so I had to settle with colouring him with the material editor. After doing this, I sat him in place on a bench in the courtyard and prepared him for my animation.

Overall I'm happy with the model and how it came out, even if it didn't work completely as intendid, I'm glad I was able to have time to model a human and fit it into my animation to show that I have learnt about it and was able to do it.
Improving the Castle and Creating the Backdrop part 2
Following on from my previous, we now have an almost complete castle and the environment is looking pretty good too. The first thing to do now is to finish off the castle, and for that we need the courtyard area. This area was pretty simple to make - all it was was 4 walls which was made from boxes with UVW Maps applied to them, a few benches which we made earlier and to change the textures on the ground. The grass needs to be a brighter green inside the courtyard and there needs to be an area with a stone floor. Once I had this, I imported in my crossbow and placed in where I thought I would need it for my animation.

Now moving back to creating the rest of the environment and more specifically the backdrop itself. I wanted my area that my castle is in to be surrounded my hills and trees; so a forest area. I searched on google for a high resolution image and once I found one I edited it slightly to better fit into the scene. To place the backdrop onto a surface, I created three large planes around the ouside of my scene and bent them so that they have a nice curve instead of a sharp point at the corners. I applied the image on the back plane and flipped it on the two either side so there isn't a noticable seam between the planes. Now we have the backdrop, we can move onto the smaller details around the outside of the castle.
As the backdrop contains alot of trees, I wanted to add some trees of my own to help blend into the backdrop. This helps improve on clutter, aesthetics as well as blending for the animation. To place a tree into the scene, I went into the create menu and went to the AEC Extended drop down list. From there I selected foilage and chose the one that most resembeled the trees in the backdrop. I placed them around the scene and by generating a new seed for each one, each tree is unique and looks slightly different. Using foilage I was also able to create bushes, shrubs and the greenery on the castle wall on the front. This adds more character to the scene and makes the ground terrain less repetitive.

Chairs and Benches
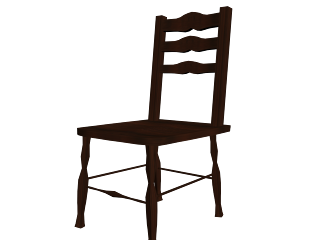
To add more detail to the castle and some clutter, I decided to make some chairs, tables, lamps, benches for the courtyard and an altar for the monastery. These were all very simple to make, requiring few shapes and the one that took the most time was the chair because of the small details. I based the chair off of the following picture, and created the rest of the objects without a reference.

I started the chair with the seat using the box tool. I cut out half of the shape and applied a symmetry modifier, making the process slightly easier. The symmetry modifier is definately one of the most useful tools I've learned to use in this program. Once I had the box, I pushed and pulled vertasis around the corners to smoothen them slightly. I also made a dip in the top of the seat using the same method. Once this was done, I made the legs out of boxes and after converting them to editable polys, used the scale and rotate tool on the lines to get the correct shape. This was the hardest part of the chair as it took a while to get the details correct. Finally, the top bit of the chair is made out of more boxes and the shape is obtained again from pushing and pulling the vertasis.
Once I had the chair done, it was a matter of resizing and scaling the nessecary shapes to get the bench and no extra shapes were added to it.
The next thing to do was the table, which was the easiest. 5 boxes in the shape of a table top and legs, and rotate the legs slightly so they don't go straight down. Once everything in place, attach everything together and you have a table. I applied a mahogony texture to all of the objects, as it looks like a nice high quality wood and fits well within the scene.
The altar was the next easiest as I had made the flags beforehand and had experience using the cloth modifier. The altar itself is just a big box, and the cloth that lays on top is a white plane which stretches and drops down over the altar once the object properties are set and after simulating local. as this didn't require any animation, I simulated it until it was in a nice position and left it there.
The lamp was the hardest to make, as I didn't have much of an idea of how it would look. I started with a box and used the sphere modifier to make it into a ball. I then cut off the top and bottom of the shape and started extruding it up and outwards. Once I had the shape, I applied a texture to the bottom of the lamp and a glass texture to the top so you could see the light shining through. Unfortunately, when I actually put a source of light inside the lamp it wouldn't spread to the outside, even though the material opacity was down quite alot. Because of this, I found it to be good to add an additional omni light on top of the lamp that adds a glow that looks like it's coming from the lamp.


I started the chair with the seat using the box tool. I cut out half of the shape and applied a symmetry modifier, making the process slightly easier. The symmetry modifier is definately one of the most useful tools I've learned to use in this program. Once I had the box, I pushed and pulled vertasis around the corners to smoothen them slightly. I also made a dip in the top of the seat using the same method. Once this was done, I made the legs out of boxes and after converting them to editable polys, used the scale and rotate tool on the lines to get the correct shape. This was the hardest part of the chair as it took a while to get the details correct. Finally, the top bit of the chair is made out of more boxes and the shape is obtained again from pushing and pulling the vertasis.

Once I had the chair done, it was a matter of resizing and scaling the nessecary shapes to get the bench and no extra shapes were added to it.
The next thing to do was the table, which was the easiest. 5 boxes in the shape of a table top and legs, and rotate the legs slightly so they don't go straight down. Once everything in place, attach everything together and you have a table. I applied a mahogony texture to all of the objects, as it looks like a nice high quality wood and fits well within the scene.
The altar was the next easiest as I had made the flags beforehand and had experience using the cloth modifier. The altar itself is just a big box, and the cloth that lays on top is a white plane which stretches and drops down over the altar once the object properties are set and after simulating local. as this didn't require any animation, I simulated it until it was in a nice position and left it there.
The lamp was the hardest to make, as I didn't have much of an idea of how it would look. I started with a box and used the sphere modifier to make it into a ball. I then cut off the top and bottom of the shape and started extruding it up and outwards. Once I had the shape, I applied a texture to the bottom of the lamp and a glass texture to the top so you could see the light shining through. Unfortunately, when I actually put a source of light inside the lamp it wouldn't spread to the outside, even though the material opacity was down quite alot. Because of this, I found it to be good to add an additional omni light on top of the lamp that adds a glow that looks like it's coming from the lamp.

Waving Flags
To add more detail, colour and additional animation to my castle, I decided to put in some banners and flags. To make a flag I first of all used the line tool to draw out a box. Once I had the box in place and at the right shape, the next step was to add a garment maker modifier, which basically adds a mesh to your shape, and you can increase the number of polygons on the material by increasing the number of iterations - a higher number of iterations means a higher quality end product.
After setting the garment maker, I added my texture which was the Italian flag and put on a UVW Map to fit it to the shape. Once I had this, I was ready to add the cloth modifier. This modifier takes a while to get used to, but once I figured out how to appropriately make use of it, it was easy and very fun to use. At this point I created a flag pole so that I had something to attach my flag to. The next step was to set the object properties for my flag. The material I used was cotton, and then I added my flag pole as to the table and enabled it as a collision object.
After doing this, I was able to attach my flag to the flag pole by dropping down on the cloth modifier and going to the group sub-menu. Once I highlighted the vertasis I wanted to connect to the pole, I grouped them up and used the sim node tool to attach this group to the pole. At this the flag is fully functional and after simulating it, it shows the flag taking shape and dropping down the pole. To make the flag much more realistic within my scene, I needed to add a way of making it move freely. To do this, I added a wind force, which is found under the 'create -> space warps -> forces' menu. A force is something that has an outward effect on other objects on your scene, such as in this case, wind blowing our flag so that it doesn't fall down lifelessly.

Now that the wind is in the viewport, I pointed it in the direction that I wanted my flag to blow, that is away from the flag pole, and enabled the force on the cloth modifier on the flag. After doing this, it was a matter of adjusting the strength of the wind to get the wind looking as realistic as possible. I used the same process to create the banners on the castle - except I attached the banners to the castle wall so they didn't fall into the floor due to gravity and used a spherical wind force instead of a directional one so that the banners blow around a bit more sporadically.
Improving the Castle & Creating a Backdrop
The opening scene of my animation is going to be the camera rolling in from the path in front of the castle and going into the castle, showing the surrounding area and setting up the area for the next scene. For this, alot of detail has to go into the backdrop and area around the outside of the castle to try and make it look as realistic as possible.
The first thing I need to do is add more detail and definition to the castle itself. It needs to be bigger, look more realistic and have functioning windows and doors. To do this I need to cut out the black areas in the castle and add windowsills to the windows. Unfortunately, because of the way I made the castle, when you view the inside of the shape, it shows up as invisible. Because of this, I need to recreate the inside walls and I did this by adding boxes, aligning them up in the correct position and applying the appropriate material at the same scale as the outside walls using the UVW Map modifier. Having repeated this process for all the inside walls that are going to be visible, the next step was to add some small details to the inside area, such as tables, chairs and sources of light. Because these would be barely visible, if at all, only low poly models are required.
Once this was done, I wanted to add another section onto the castle to make it more like a genuine castle. I wanted this area to be open and for characters to be able to walk in and out of the building (even if that isn't what is going to happen, I want it for aesthetic reasons) so to make this I used a similar process to how I made the first part of the castle, except using separate boxes for each wall so cutting out the shape won't make the inside invisible. Again, as the inside isn't likely to be very visible from the outside, only a few details need to be added. I wanted this section to have a monastery type of feeling, so I added chairs and an altar at the opposite end of the room. The trickiest part of this building was getting the lighting correct and getting the roof the way I wanted.

Once the castle is complete, detail needed to be added to the rest of the backdrop. The first thing I did was create a plane for the ground which I would use the grass texture on, and made this quite alot bigger than the area which the castle occupies. As I wanted a pathway leading up to the castle, I went into photoshop to modify the textures I was using so that the rocky path blended in with the grass on either side. After doing this, it was a matter of pulling up vertex's and making the area bumpy and uneven.
 |
| (mostly) seamless texture |
Tuesday, 1 May 2012
Autodesk 3ds Max 2012
There is a fairly large difference between the amount of things you can do between versions 2011 and 2012 of 3ds Max. The main issue that comes between them is that you cannot import files created in 3ds Max 2012 into 3ds Max 2011. As I created the majority of my models using 3ds Max 2012 on my home computer before realising that I can't use them on the computers in the university, I was stuck in a bit of a situation where I had to choose between continuing my work in 2012 or redesigning everything that I have done in 2011. As this is a fairly lengthy and time consuming module, I opted for the decision of continuing my work in 2012 as that meant I could keep working on my project without having to waste time recreating models I had already done once already.
Another large difference between the two versions is the physics engine that they use. 2011 uses reactor - an engine that is essentially a mod that was created by Havok for use in 3ds Max. This was replaced in 2012 for their own inbuilt engine called MassFX. What they are each able to do are similar, except the processes required for each are very different. As I have have already simulated animation for my crossbow in 3ds Max 2011 using reactor, I may have to recreate this using MassFX after importing it into my scene.Whether or not this will be a daunting task is yet to be discovered - hopefully the time taken to animate the crossbow in reactor will pay off and the knowledge will partially transfer over into MassFX.
Reference:
http://physxinfo.com/news/5519/3ds-max-2012-released-new-massfx-system-overview/
Author: Zogrim (2011)
Accessed: 24/04/12
Monday, 30 April 2012
Animating my Crossbow
Using reactor I was able to animate my crossbow in such a way that when the pulling mechanism was pulled back and released, the bolt that was attached to it is propelled forward with increased momentum. The way this was animated was using a combination of auto key and set key on the timeline for separate elements of the crossbow.
 |
| Frame 0 |
 |
| Frame 65 |
Once the bolt is fired, the pulling mechanism moves forward slightly and the bolt is propelled forward at a great speed (the bolt moves away faster as it has been set to drop off at a farther away distance. The curve editor has been used to speed up the rate that it shoots off from the crossbow and to stop it from slowing down too much at the end of the animation). As the bolt moves away from the crossbow, the crossbow itself is jogged backwards by the momentum. This is corrected as the mechanism hits the front of the crossbow and relaxes back in place. The crossbow is moved backwards for a few frames before falling back into its original position. At the same time as this, the wheels are animated the opposite way so that it gives the illusion that the wheels actually move with the movement of the crossbow.
 |
| Frame 77 |
A few frames after this (82/100), the crossbow bolt is no longer able to be seen from this view. This gives an idea of the speed at which the bolt has been shot out of the crossbow at. At a different view, we can see that the bolt still moves away from the crossbow up until frame 99 where it drops onto the grass and frame 100 it stops moving completely as the animation ends.
 |
| Frame 100 |
Animation of crossbow being fired
Planning my animation
Now that I have some models that may be used for my animation, the time has come to commence the planning and storyboarding. An idea that I have is to show how the crossbow reacts when shooting objects of different shapes and sizes. The problem that I see with this is that it seems repetitive; like the animation isn't thought out enough or could be improved on. To hopefully cancel this out, I will be animating using different physics settings each scene and adding some humour to the animation.
Scene one
The first scene will start off with the camera at a distance in front of the castle, and move inwards as it goes through the castle gate and into the courtyard where the crossbow is waiting in the centre. The camera will pan around the courtyard to show off the area and then focus on the crossbow. If I managed to model a human in time for the animation, there will be a man there that either raises up his arm, letting the crossbow know that it can fire, or if I can rig it so that it looks like he is firing the crossbow himself, I will do that. The first target that the crossbow will fire at will be a barrel. There will be an overlay on the screen that displays information such as the durability of the object that is being shot at, as well as wind speed and direction. The crossbow will then fire at the barrel, either knocking it over or exploding it/penetrating it if I am to make that happen.
Scene two
This scene will start off in the courtyard similar to what was shown in the first scene. The object that will be shot at this time will be a stack of barrels, and the overlay will display the relevant statistics of the object and a different wind direction. The crossbow shoots the barrels and the physics disrupts the stack and they fall over everywhere.
Scene three
Moving up from a stack of barrels, this time we will be shooting our crossbow at a statue of a man. The stats of the object and wind direction is shown again, and the crossbow is fired. The statue will either explode (as intendid) or get knocked over by the crossbow bolt.
Scene four (final)
This will be the final scene, and instead of going up to an object of higher durability than a stone statue, the crossbow will be shooting at a real person. The person will be rigged up with a skeleton and as the crossbow bolt colides, the person should be penetrated and flung backwards as defined by the physics.
Alternate ending
If I am unable to make the crossbow bolt physically penetrate the person at the end, then instead I will set up a camera that is in the point of view as the person, and the animation will end as the crossbow bolt hits the camera and the screen goes back.
Friday, 2 March 2012
Castle with a Tower
My third model I am doing for the project is a castle that I am using as environment to set the scene as 15th century Italy. I am modelling it after Vincigliata Castle, which is a medieval castle located in the region of Tuscany. The images I am using as reference are:


I started the model with the tower in one of the corners of the castle, and it didn't go too badly considering it was my first proper attempt at modelling a building. For the shape I just used a box and extruded polygons and edges where needed. I also used the bridge tool to create the slants on the top of the tower. To create the windows I cut out polygons (using the cut tool while in editable poly) where needed so that I could get that arched shape, and extruded them inwards and I did the same for the frame of the window. I used a darker brick texture for the main building and a slightly lighter brick texture for the window frame and accents.


Once I had the tower done, I made 4 more boxes for the rest of the castle and did mostly the same thing with extruding and cutting polygons. The thing I dislike most about it is the lack of detail; it's just a building with no real atmosphere. I also don't like that the windows are just black but I couldn't figure out how to make a hole all the way through the building and cap off the inside so you couldn't see inside the wall. Before I start animating, I want to edit this model more so that it has more life, and so you can see inside the windows and for there to be an actual doorway. I would also like to tweak the vertices so that lines aren't completely straight, so there are some bumps and tears in the castle walls, to add to the realism.


I started the model with the tower in one of the corners of the castle, and it didn't go too badly considering it was my first proper attempt at modelling a building. For the shape I just used a box and extruded polygons and edges where needed. I also used the bridge tool to create the slants on the top of the tower. To create the windows I cut out polygons (using the cut tool while in editable poly) where needed so that I could get that arched shape, and extruded them inwards and I did the same for the frame of the window. I used a darker brick texture for the main building and a slightly lighter brick texture for the window frame and accents.

Once I had the tower done, I made 4 more boxes for the rest of the castle and did mostly the same thing with extruding and cutting polygons. The thing I dislike most about it is the lack of detail; it's just a building with no real atmosphere. I also don't like that the windows are just black but I couldn't figure out how to make a hole all the way through the building and cap off the inside so you couldn't see inside the wall. Before I start animating, I want to edit this model more so that it has more life, and so you can see inside the windows and for there to be an actual doorway. I would also like to tweak the vertices so that lines aren't completely straight, so there are some bumps and tears in the castle walls, to add to the realism.

The Crossbow
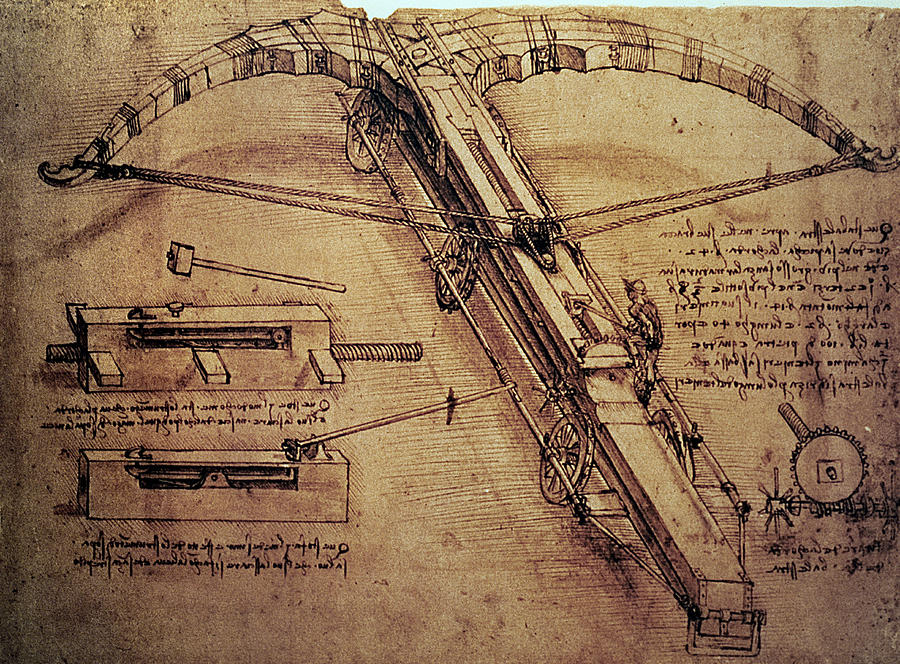
The second of my models for the project is the giant crossbow itself, and this model is the one that definately took the longest and most work out of all of them. There was alot of trial and error involved as I was still learning the basics of the program and it had alot of awkward angles and curves to deal with. My main reference images were these two pictures, and the first one in particular helped me alot:

The first thing I did was get the body of the crossbow the right shape and proportions, so that when I started working on the rest of the crossbow, none of the other details were the wrong size. The main shaft was made of three boxes, one long one on the bottom, and two on the top. Once I had this, and got the shape correct on the curves at the back of the crossbow, it was time to work on the wheels. Making the wheel itself wasn't too difficult, I used a cylinder for the shape of the wheel and some boxes in the middle as well as another cylinder right in the center. Once I had one wheel done I could just clone it 5 more times and line them up in the right position.

The hardest bit to create was the top end of the crossbow, where all the action will be happening. Using the first picture as reference, I made the first part of it using a box and the bend tool, converting it to editable poly and moving the verteces around to get the desired shape. After I had this, I needed to create the top and bottom parts that connect to this, and I used a similar method of pulling the vertices to get the correct curve, and bending it to the same degree as the first bit plank.

Once I had this done, I started on the rope that is attatched from the rings at the end of the bow to the center, where it is pulled back in order to provide enough tension and power to force out the ammunition. To create the rope I used the hose and attatched one end to the ring, and the other to the pulling device in the middle of the bow. I did the same to the other side, and connected them both up using the select and link tool. Now, when I pull back the pulling bit, the rope stretches with it. I tried to make it so the wood at the end of the crossbow bends slightly when pulled back, but I couldn't manage to do figure out how that was done. There is still work to be done on the model when starting the animation, such as to get the wheels to move and the whole crossbow to have a weight and connect everything together, and have it so that it can fire objects out of the crossbow.

Do a Barrel Roll
One of my main models for my project is a barrel, which is going to be used as a background item in the scene and also as a target for the crossbow to shoot at. The design for the barrel itself wasn't too hard, although I did use lots of shapes to create it, and I made sure that it was hollow on the inside. This was also the first time using reactor and learning how it works, as my animation will depend on the use of physics and gravity. To create the barrel shape I first put a box on the scene in the shape of a plank and used the bend tool to warp it slightly. I then cloned this shape and flipped it so that it connected to the first one. I then cloned the two shapes together repeatedly and rotated them to get a circular shape. Looking back on it, it would have made more sense to put an actual circle in the scene to build around.

After all the middle bits of wood were in place, I used a cylinder to create the top and bottom of the barrel and another cylinder to act as a plug in the top of the barrel. I then used some tubes to wrap around the barrel, to hold it together. Once the barrel was complete, I added the texture using the compact material editor, and used the UVW Map modifier to scale it down and wrap it it around the barrel more realistically.

Now we have the finished barrel, it was time to learn about reactor and MassFX. I watched a few videos on youtube that explained the dynamics and basics of reactor, but it was difficult to translate to how I should use it on my barrel. I used the MassFX Rigid Body modifier to make it a dynamic object, however when I previewed simulation, the barrel just explodes everywhere. I suspect this is because I used so many shapes and haven't properly connected them into one shape, but I'm not sure how that is done or if that will produce an undesired result when I actually come to my animation. Either way, this is a problem that I need to figure out how to fix before that time comes. For now, I've got it set as a static object so that it stays still and still has the MassFX Rigid Body modifier.

I cloned the barrel a few times and added some lighting to present the scene better. Even though it didn't work out as intend, I enjoyed the learning experience and once I understand it better, it will prove very useful in future 3d modelling projects.

A Treaure Chest of Sorts
Today I had a go at creating a chest, with the intention of playing around with objects and modifiers, learning how to produce higher quality models and textures. First of all I created a room using 5 planes (one for each wall and a floor) and mapped them with a dirt texture. I used additional bump to give it more depth and added some standard omni lights with shadows enabled to set the scene some more. My first attempt at creating the chest was a failure; I started with a box shape and used the cut tool to add edges and then deleted the inside of the box, to make it look like an empty box. I duplicated this box and flipped it around and manipulated it to create the shape of the top of a chest, rotating it so it looked like the chest was slightly open and you could see inside. When I rendered this, you could see through to the plane underneath the chest and also through the top of of the chest, and I assume that this was because I deleted the polygons inside the box. So I started again, this time using planes to create a box shape, which gave me the same outcome visually except it uses more shapes in total. I connected all of them together using the connect tool and cloned it again to create the top of the chest. After getting a good result I decided to try and hinge the two parts of the box together, so that it moved on an axis at the back of the chest, so that it actually opened and closed, however this proved too difficult to achieve so I decided to leave it out and keep the images as two static boxes.

Playing around with the material editor enabled me to create a silver material to use on my chest, and also a glass texture to allow people to see into the chest. The creation of the glass texture was accidental, however it's a useful thing to know and it will help me in future projects. I used the UVW Map modifier to scale down the maps on all objects, making them look more realistic and giving them more depth.

After getting a result that I was happy with, I decided to create some coins on the inside of the chest so that it wasn't just an empty chest. The coins were made using the cylinder tool, and extruding one of the edges slightly to give it more depth. I then added a texture to it, used the UVW Map modifer to scale it down and cloned it many times so the bottom of the chest was littered with coins.

I think that I could use this chest design in my final project, if I adapt it to the scene and edit it so that it fits in. I think I could use it to hold the crossbow bolts for my crossbow, or just use it as an object in the background.
The Da Vinci Project
For our project we have to create an animation about one of Da Vinci's machines using Autodesk 3DS Max. The machine that we use is our own choice and there is no set time length on the animation. We have to pick a machine, model it, animate it, and present it in a 15th century Italian environment.
 Research
Da Vinci was an interesting person; he is described as a true renaissance man and he specialised in many professions such as painter, inventer, architect, sculptor, mathematician, engineer and writer. There were more fields that he delved in, however he was most known for his paintings and inventions. His most famous painting is the Mona Lisa, and perhaps his most famous invention is the flying machine. His inventions are so amazing because they are well ahead of the time that they were made in; many of his plans and inventions were the basis of some creations in todays world, and some are still being studied.
Among his inventions are the giant crossbow, the machine gun and the flying machine. For my project I want to use one of these devices as I find them the most interesting, and can think of the most ideas for. Although I will only be using one for my animation, it would be good practice and experience to have a go at modelling all three.
Decision
I have decided to choose the crossbow as my final design, as I think it will be a good challenge to model and animate, and I have a good idea for the basis of my animation. That idea is basically to show the crossbow firing different objects at different targets, showing the effect it has with the physics and density of the models. I believe this will be a difficult animation as I have never animated in 3DS Max before and it will require me to learn how to use reactor or MassFX, which gives objects a mass and allows them to adhere to gravity and the likes. The environment it will be set in is a 15th century Italian countryside, perhaps in the courtyard of a castle, surrounded by trees and castle walls. Whether or not I have human models in my animation is yet undecided, as I'm not sure how plausable it will be to model people and have them move around loading the crossbow and learning how to use MassFX in my animation.
ResearchDa Vinci was an interesting person; he is described as a true renaissance man and he specialised in many professions such as painter, inventer, architect, sculptor, mathematician, engineer and writer. There were more fields that he delved in, however he was most known for his paintings and inventions. His most famous painting is the Mona Lisa, and perhaps his most famous invention is the flying machine. His inventions are so amazing because they are well ahead of the time that they were made in; many of his plans and inventions were the basis of some creations in todays world, and some are still being studied.
Among his inventions are the giant crossbow, the machine gun and the flying machine. For my project I want to use one of these devices as I find them the most interesting, and can think of the most ideas for. Although I will only be using one for my animation, it would be good practice and experience to have a go at modelling all three.
Decision
I have decided to choose the crossbow as my final design, as I think it will be a good challenge to model and animate, and I have a good idea for the basis of my animation. That idea is basically to show the crossbow firing different objects at different targets, showing the effect it has with the physics and density of the models. I believe this will be a difficult animation as I have never animated in 3DS Max before and it will require me to learn how to use reactor or MassFX, which gives objects a mass and allows them to adhere to gravity and the likes. The environment it will be set in is a 15th century Italian countryside, perhaps in the courtyard of a castle, surrounded by trees and castle walls. Whether or not I have human models in my animation is yet undecided, as I'm not sure how plausable it will be to model people and have them move around loading the crossbow and learning how to use MassFX in my animation.
Planes and Materials
During todays tutorial we learnt the importance of planes and how to use the material editor to apply an image to any given shape and give it some texture. Planes can be used as a flat surface to plant an image on, which is useful for creating a floor or a far away landscape. We used the compact material editor to choose an image from our library using the diffuse option to map it to our object. After clicking 'show material in viewport' we could instantly see the impact it had on the plane. Cloning the plane and rotating it so that it intersected with the first plane shows us how to create a simple background using images with the material editor.

After doing this we were taught how to use photoshop to edit an image that we then applied to the plane, giving it transparency. The image we used was a leaf, and since we wanted it to look like an actual leaf, we had to manipulate the plane so that it wasn't perfectly flat. Converting the plane to editable poly enabled us to move the vertexes around, and using soft selection we could get a more smooth result. I enjoyed learning about materials as this is a very important aspect of 3d modelling - adding textures to objects allows for much more depth and allows you to create much more appealing designs.
Thursday, 2 February 2012
Creating Life
The third and final task of the day was to use a single box to create the shape of a human. This was by far the most complex exercise and involved many new tools and was a great learning experience. From the shape of the box we had to pull out each individual block after converting it to editable poly and using the extrude or bevel tool. The vertex selection tool was then used to edit the shape so that it looks more like a person with some basic features. Overall I'm very pleased with the result of my person - it may just be a basic human shape but it took a lot of fiddling and time to achieve the result.

Apples Aren't Round
The second exercise of the day was to use a sphere shape to create an apple. After placing the shape, we had to convert it to editible poly so that we could edit it using the vertex selection tool and warp the shape of the sphere so that it looks more like a real apple. To make this alot easier, soft selection was enabled so that when one point was selected, a radius around that point is also selected and warped in the same way. Once the shape had enough lumps and bumps, we needed to make a hole in the top for the stalk. This required us to select the top pixel and drag it downwards inside the sphere. The stalk is an upside down cone which has been bent slightly into shape and placed inside the apple. I am pleased with the result as it came out far better than I had hoped. I have learned alot with the creation of this apple and hope my future projects come out as well as this.

3d Modelling and a Castle
Prior to today I’ve had no experience with any 3d design software whatsoever. The program we are using to create our 3d projects is Autodesk 3ds Max 2011. Although I had never used this program before, learning the basics and the layout wasn’t too difficult thanks to my knowledge with other design software such as Adobe Photoshop and the likes. After receiving the brief and some tips on how to start out, our first objective was to create a castle. I created the foundation for my castle using 4 box shapes and aligning them so they are connected. For the top of the wall I used the box tool again and cloned the shape and moved it around as many times as necessary. The design itself is very basic but the shape itself somewhat resembles that of a castle. I wasn’t sure how to add a door or remove a section of the wall to allow for some form of entry, so I instead used a couple more boxes and some cylinders to create a drawbridge-type thing. At this point I didn’t know how to rotate shapes so the cylinders stand straight upwards instead of angled towards the castle. I added a light to play around with the way the lighting affects the image. Overall I’m pleased with the result of my first ever attempt at using 3d software and enjoyed the learning experience that went along with it.

Subscribe to:
Posts (Atom)